Nothing beats the feeling of walking through the door after a long day to the smell of a ready-made meal. These slow cooker pulled pork tacos are the ultimate solution for a stress-free dinner that tastes like you spent hours in the kitchen.
You simply toss your ingredients into the pot, let the slow cooker work its magic, and return to tender, flavorful meat that shreds in seconds. It is a fantastic way to simplify your routine, much like these simple meal prep strategies that keep your weeknight cooking manageable.
If you are looking for a visual guide to get started, this helpful video tutorial shows exactly how easy the process is. Let’s look at why this recipe belongs in your regular rotation.
Choosing the Right Cut of Pork for Maximum Flavor
Success with pulled pork starts at the grocery store. While many cuts look similar, not all of them transform into the tender, juicy meat you want for your tacos. For the best results in a slow cooker, you need a cut with enough structural integrity and fat to handle hours of steady heat.
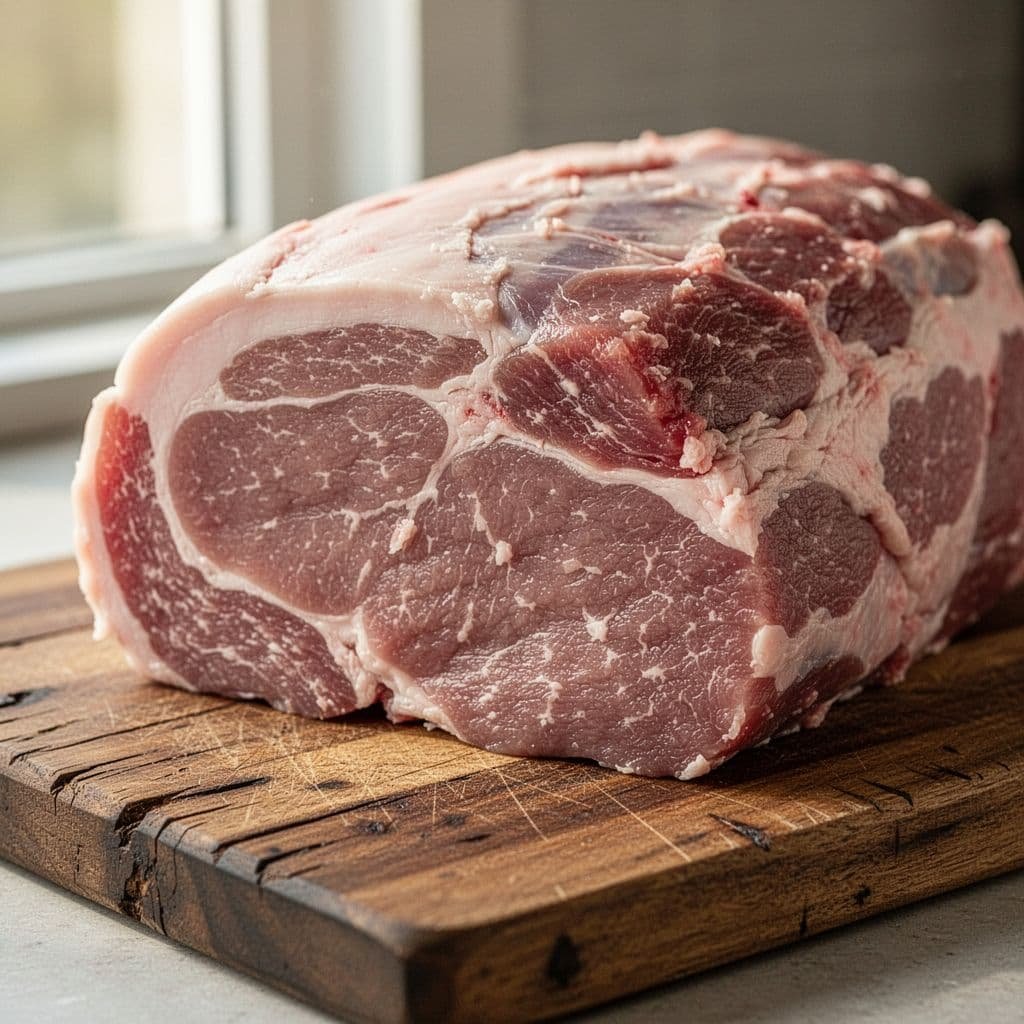
Why Pork Shoulder and Butt Rule the Slow Cooker
The gold standard for pulled pork is undoubtedly the pork shoulder, often labeled as a Boston butt or pork butt. These cuts come from the upper part of the pig’s front leg. They are packed with connective tissue and intramuscular fat, which is often called marbling.
When you cook these cuts for a long time at a low temperature, that hard-working muscle tissue slowly breaks down. As the fat renders, it bastes the meat from the inside out, keeping it moist even after eight hours of cooking. If you used a leaner cut like a pork loin, the long cooking time would cause the fibers to tighten up and dry out, leaving you with tough, stringy meat that lacks the rich mouthfeel of a proper slow-cooked shoulder. Learn more about the differences in selecting meat cuts for perfect pulled pork to ensure your dinner stays juicy.
Managing the Fat Cap for Better Results
You will often notice a thick layer of fat on one side of a pork shoulder roast, commonly called the fat cap. While fat is essential for moisture, having too much can leave your finished taco filling feeling greasy.
I recommend trimming the fat cap down until it is about 1/4 inch thick. This allows just enough fat to melt into the meat and provide deep, savory flavor without overwhelming the dish. If the piece has any loose flaps of fat or silver skin, go ahead and trim those off entirely. When you place the pork into your slow cooker, position it so the fat side faces up. This allows the fat to slowly melt down through the entire roast as it cooks.
If you are conscious about overall fat intake but still want that perfect texture, you can explore incorporating lean proteins into your diet through other meals. For these tacos, however, the fat in the shoulder is your best friend for achieving that melt-in-your-mouth consistency. Focus on buying a quality roast with visible marbling, and you are halfway to a successful meal.
The Art of Seasoning and Perfecting Your Pork
Creating restaurant-quality pulled pork at home relies on more than just the meat you choose. It starts with a bold, balanced spice rub that penetrates the muscle fibers while the pork sits in the slow cooker. When you combine the right base spices with a touch of acidity, you create a depth of flavor that carries through every bite of your tacos.
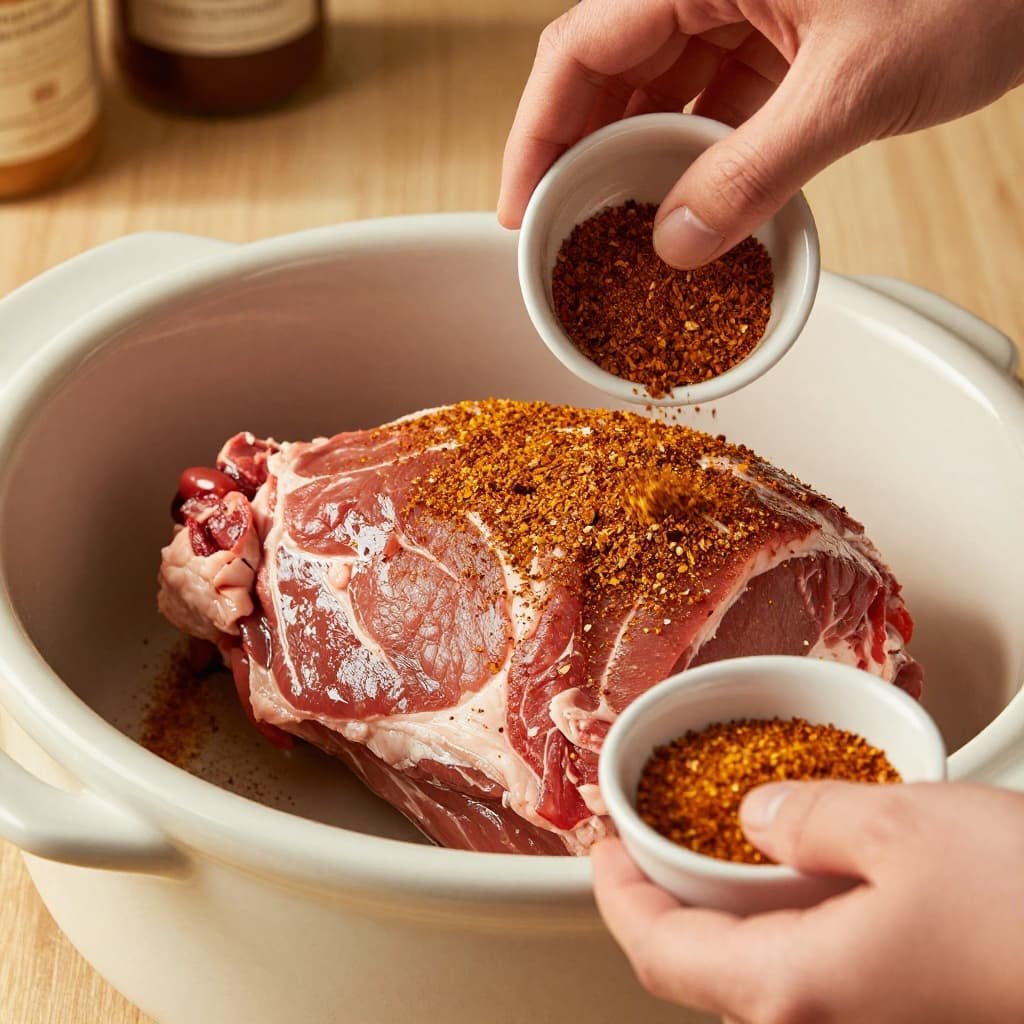
Building the Perfect Spice Blend
A simple rub is often superior to a complicated marinade. I prefer a mix that hits savory, smoky, and slightly sweet notes to balance the richness of the pork shoulder. You can adjust these ratios to suit your personal preferences, but this standard blend provides a solid foundation for any taco night:
- Salt and Black Pepper: These are non-negotiable. They wake up the natural flavor of the pork and provide a savory backbone.
- Garlic and Onion Powder: These add a savory, aromatic quality that persists even after eight hours of cooking.
- Smoked Paprika: This is the secret to getting that campfire-grilled taste without a smoker.
- Chili Powder: Use this to provide a mild, earthy warmth.
- Brown Sugar: A little sugar helps caramelize the edges and balances the saltiness of the other spices.
When you prepare your rub, mix it thoroughly in a small bowl before applying it to the meat. Massage the spices into every crevice of the pork shoulder. If you want to explore more flavor-boosting herbs for renal diets or general cooking, remember that spices remain your best tool for building complex flavor profiles without relying solely on excess salt.
The Role of Acid in Tenderization
Many home cooks wonder if adding a splash of vinegar or citrus actually changes the texture of the meat. While the long, steady heat of the slow cooker does the heavy lifting for breaking down collagen, adding a small amount of acid provides an extra boost. Ingredients like apple cider vinegar or lime juice help denature proteins on the surface of the meat.
As the science of marinating suggests, these acidic elements provide a slight softening effect on the outer layers. More importantly, they cut through the heavy fat content of the pork shoulder. This prevents the dish from tasting overly greasy. Add a splash of liquid directly into the bottom of the slow cooker alongside your spices to create a flavorful braising environment.
Mastering the Low and Slow Method
The most critical step in this entire process is your patience. Slow cooking is a game of patience, not performance. You want to set your device to the low setting and let it run for at least eight to ten hours. This long duration allows the tough connective tissues inside the pork butt to dissolve into gelatin.
If you try to rush the process on high heat, the outer layer of the meat will tighten and turn dry before the center has a chance to reach that fork-tender stage. You know your pork is ready when it pulls apart effortlessly with the pressure of a fork. If the meat feels resistant or stringy, it simply needs more time. Trust the process, let the slow cooker handle the heavy work, and wait for the point where the meat practically falls off the bone.
How to Achieve That Crispy Restaurant Texture
Transforming tender, slow-cooked pork into authentic carnitas-style taco filling is the secret to elevating your home dinner. While the slow cooker handles the long, gentle braise, a quick blast of high heat at the end creates those coveted crispy, caramelized edges that define restaurant-quality tacos. Incorporating effective meal planning strategies ensures you have the time to dedicate to these final steps, turning a simple meal into something memorable.
The Best Ways to Shred and Rehydrate
Once your pork is pull-apart tender, move it to a large bowl or directly onto a cutting board. Use two sturdy metal forks to shred the meat by pulling the muscle fibers in opposite directions. You want a mix of bite-sized chunks and finer strands, which provides the best texture for your tacos.
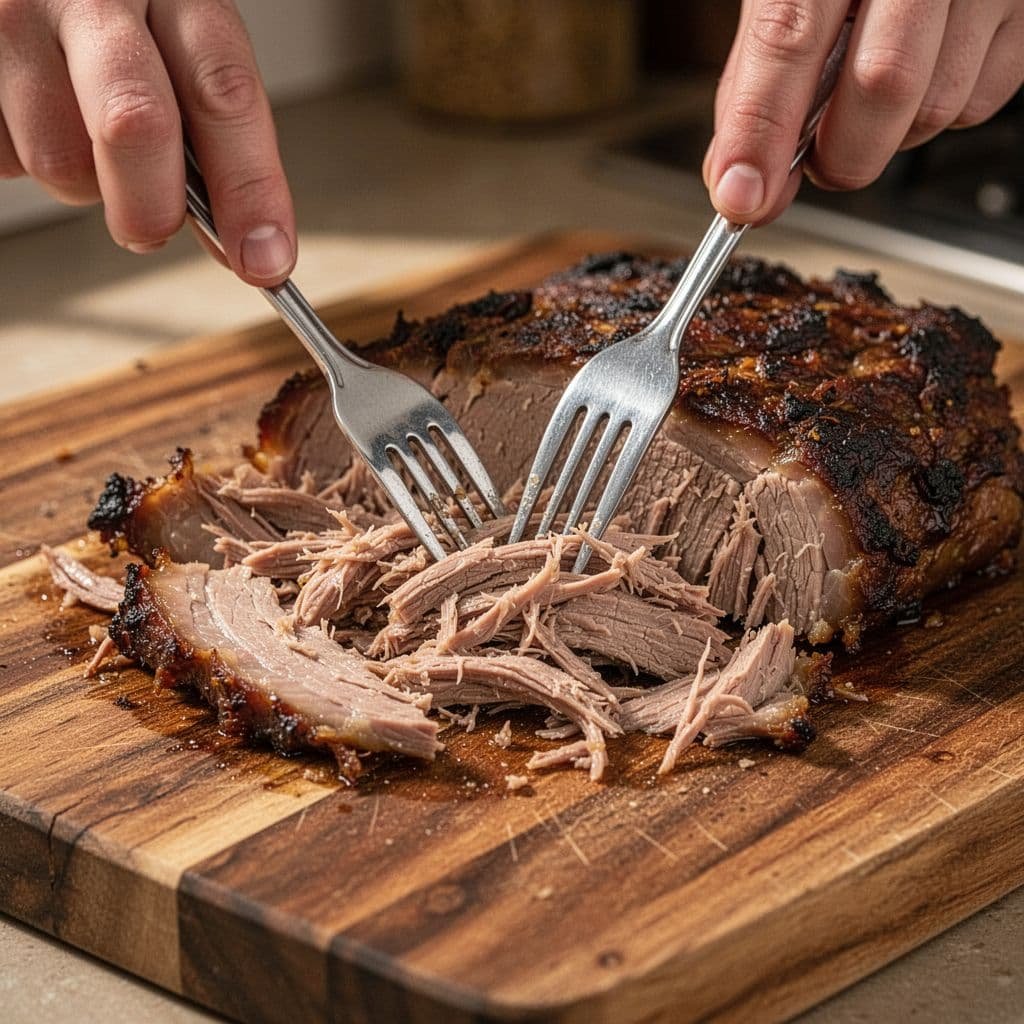
As you shred, avoid discarding the liquid left in your slow cooker. This cooking juice contains concentrated fats and seasonings that are essential for flavor. Drizzle a few spoonfuls of this reserved liquid over the shredded meat before you proceed to crisping. This step prevents the pork from drying out under the intense heat of a pan or broiler. It ensures every bite remains succulent and packed with the juices you spent hours developing.
To achieve that signature carnitas texture, choose one of these two finishing methods:
- Stovetop searing: Transfer the shredded pork and a small amount of liquid into a nonstick skillet over high heat. Let the liquid evaporate until the pork begins to sizzle in its own rendered fat. Fry the meat, stirring occasionally, until it turns golden brown and develops crispy, caramelized edges. For a detailed technique, check out this guide on how to cook crispy carnitas.
- Broiler finish: Spread the shredded pork in a single layer on a rimmed baking sheet. Place the sheet under a preheated broiler on high for 4 to 6 minutes. Watch it closely, as the sugar in the rub can char quickly. This method is faster and results in beautifully browned, slightly charred bits that add a perfect crunch to your tacos. Learn more about the benefits of using a broiler for this process.
Pro Tips for Warming Tortillas
A taco is only as good as the shell that holds it. Cold or brittle tortillas will break the moment you load them with meat, so warming is non-negotiable. Your goal is to make the tortilla pliable and slightly toasted to enhance its flavor.
If you have a gas stove, place your corn or flour tortillas directly over a medium-high flame for a few seconds per side. Use tongs to flip them frequently until you see light char spots and the edges soften. This adds a subtle, smoky depth that complements the richness of the pork.
When cooking on an electric stove, use a dry heavy-bottomed skillet over medium heat. Place the tortilla in the hot pan and warm it for about 30 seconds per side. It should become warm, soft, and flexible enough to fold without cracking. Keep your finished tortillas wrapped in a clean kitchen towel or a dedicated warmer to retain heat until you are ready to serve. This simple effort makes a world of difference in the final assembly.
Building the Ultimate Taco Bar
A well-organized taco bar turns a simple dinner into an interactive meal that everyone enjoys. By laying out a variety of fresh ingredients, you allow your guests or family members to customize their plates exactly how they like them. This approach works just as well for a solo weeknight as it does for a gathering of friends. When you prepare your components in advance, you can focus on enjoying the food rather than standing at the stove.
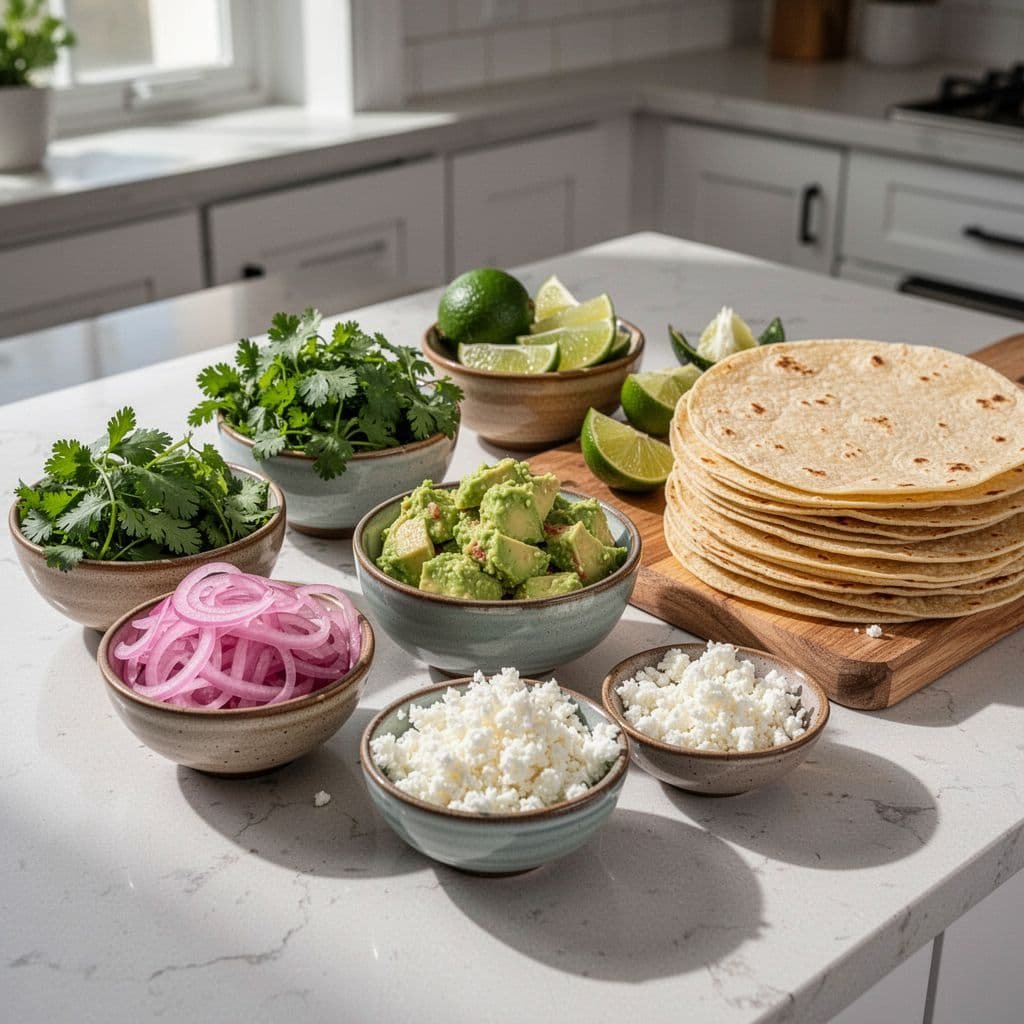
Essential Toppings for Pulled Pork
Pulled pork is rich and savory, so it pairs perfectly with toppings that provide acid, crunch, or freshness. You do not need every topping on this list to have a great meal, but offering a few from each category keeps things interesting. For more inspiration on balancing flavors, look at these healthy dinner recipes for busy weeknights to keep your meal planning simple.
To get started, consider these popular options:
- Tangy elements: Pickled red onions are fantastic for cutting through the richness of the pork. A squeeze of fresh lime juice also brightens the entire flavor profile.
- Fresh textures: Diced avocado or a quick guacamole adds a creamy element. For a refreshing crunch, try shredded cabbage or a crisp cilantro-lime slaw.
- Flavorful accents: Fresh cilantro is a classic finish. If you enjoy heat, add sliced jalapeños, either fresh or pickled.
- Cheesy finishes: Crumbled cotija cheese offers a salty, firm texture that stands up well to warm meat. If you prefer a meltier option, a mild shredded Monterey Jack works beautifully.
Setting Up for Success
Presentation matters when you are building a DIY setup. Group your ingredients in small bowls so they are easy to reach and refill. Place your warm tortillas near the shredded pork, as this makes the assembly line intuitive. You can find helpful tips on how to set up a DIY taco bar for a crowd to keep the flow smooth.
If you feel overwhelmed by the choices, stick to a theme. For a classic street-taco style, keep it simple with just cilantro, white onion, lime wedges, and a good salsa verde. Alternatively, the street taco vibe relies on these minimal, high-quality ingredients to let the meat shine. The most important part of any taco bar is creating a spread that makes you excited to sit down and eat. Trust your own taste buds, and do not be afraid to mix and match until you find your perfect combination.
Conclusion
Slow cooker pulled pork tacos prove that you don’t need a professional kitchen to serve a restaurant-quality meal. By letting your slow cooker handle the long, gentle cooking process, you gain maximum flavor with very little effort. It is the perfect centerpiece for your next family dinner or casual party.
If you find yourself with extra meat, don’t worry because pulled pork freezes perfectly. Simply pack the shredded pork into airtight bags or containers, and you will have a ready-made meal waiting for you on a busy night. Just thaw it in the fridge and give it a quick sear to freshen the texture.
Give this simple recipe a try this week and see how much time it saves you. If you enjoy this approach, you might also want to explore other healthy protein-packed taco alternatives for your future meal planning. Your future self will appreciate having a delicious, stress-free dinner ready to go.
Save pin for later


- How to Manage Period Pain Effectively - 29/06/2026
- 8 Healthy Pasta Salad Recipes for Lunch and Dinner - 23/06/2026
- Slow Cooker Pulled Pork Tacos Recipe for Easy Taco Night - 22/06/2026
